

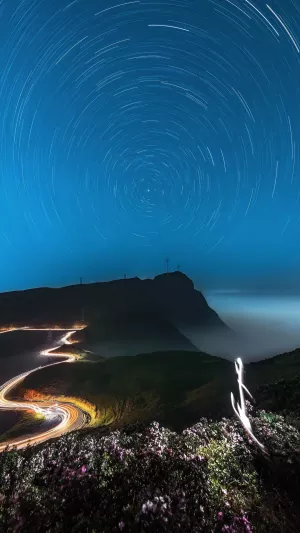
A star trail photograph is a mesmerizing visual capture of the continuous paths created by stars in a long-exposure shot taken by a camera.
In this type of photography, the camera remains stationary, capturing the movement of stars over time as they appear to arc across the sky. This technique highlights the Earth's rotation, which causes the stars to trace circular paths in the night sky.
Stars are not fixed points in the sky; they are in constant motion. The Earth's rotation is responsible for the apparent movement of stars, creating arcs as they traverse the night sky. While the stars seem stationary to the unaided eye, sensitive instruments can detect their subtle movements.
This phenomenon occurs because the stars are incredibly far from us. The further an object is from the observer, the less perceptible its motion is. Even the closest stars are farther from us than any terrestrial landmark, making their movement almost imperceptible without the aid of photography or other precise instruments.
Star trail photography is a popular subject among photographers due to its stunning visual appeal and the relatively low barrier to entry. With basic photographic equipment and some fundamental techniques, anyone can capture these celestial wonders. To successfully photograph star orbits, it’s essential to make thorough preparations:
<b>1. Choose the Right Time to Shoot</b>
The optimal time for star orbit photography is between 9 p.m. and 4 a.m. This period typically begins about three hours after sunset and ends three hours before sunrise. The best seasons for this type of photography are summer and autumn when the weather is cooler and less prone to causing camera fogging. Selecting a clear night is crucial as it enhances the visibility of star paths and produces a more striking image.
<b>2. Find the Right Place to Shoot</b>
Location is key to capturing beautiful star orbits. Ideal locations are those with flat terrain or elevated areas like mountaintops. It is important to avoid areas with significant light pollution from city lights, as artificial lighting can interfere with the natural light of the stars and diminish the quality of the image. Dark, remote areas far from urban environments are perfect for achieving the best results.
<b>3. Secure the Tripod</b>
The stability of the tripod is critical when photographing star orbits. Any movement of the tripod during the long exposure can result in blurred or misaligned images. Once the camera and tripod are set up, ensure they are firmly in place. Position the tripod on stable, flat ground, avoiding the edges of potholes or uneven surfaces to prevent it from slipping or shifting during the shoot. This stability is essential for compiling a successful star orbit image later.
<b>4. Camera Settings and Techniques</b>
In addition to the preparatory steps, configuring your camera settings correctly is crucial. Use a low ISO setting to reduce noise in the image, and set the aperture to a low f-stop number to allow as much light as possible to reach the sensor. The exposure time should be long enough to capture the movement of the stars, often requiring multiple exposures stitched together using software. A remote shutter release or timer can help avoid any camera shake during the exposure.
By following these guidelines, you can create captivating star trail photographs that showcase the beauty and mystery of the night sky. This type of photography not only requires technical precision but also a deep appreciation for the natural world. Whether you are an amateur photographer or an experienced professional, capturing the elegant dance of stars across the sky can be a rewarding and awe-inspiring experience.


